 |
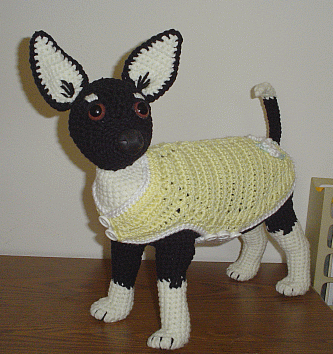
 มีแพทเทิน มาให้เพื่อนๆๆช่วยแปลค่ะเป็นตุ๊กตาหมานะค่ะ(ตุ๊กตาถัก)

LEGS:
Starting with foot and front leg.
Rnd 1...form a ring around your finger, work 7 scs in ring, pull tight, join, ch 1, do not turn work now and throughout
Rnd 2...2 scs in joining st, sc in next st, 2 hdcs in next 3 sts, sc in next st, 2scs in next st, join, ch 1 (12sts)
Rnd 3...sc in joining st, 2 scs in next st, sc in next 2 sts, 2 hdcs in next 5 sts, sc in next 2 sts, 2scs in next st, join, ch 1 (19sts)
Rnd 4...sc in joining st, sc in next 18 sts, join, ch 1
Rnd 5...sc in joining st, sc in next 5 sts, sc dec 4 times, sc in next 5 sts, join, ch 1 (15sts)
Rnd 6...sc in joining st, sc in next 4 sts, sc dec 3 times , sc in next 4.
.Do Not join (12sts
Rnd 7-9...sc around 12 sts without stopping
NOTE: You can count 12sts 3 times, or as I do
.3 rows X 12 sts = count 36
NOTE: Stop at this point to form toes. Place a small amount of fiber fill in the foot. Using a contrasting color yarn and yarn needle, insert needle in bottom of foot then up between hdcs of Rnd 3 then back down to same spot in bottom of foot
do this for all 4 toes, see close up. Using main color and yarn needle, take a couple of stitches in foot above toes to hold foot slightly flat.
Rnd 10-13...sc around 12 sts without stopping, counting as before
Rnd 14...sc in next 3 sts, 2scs in next st, sc in next 8 sts (13sts)
Rnd 15-17...sc around 13 sts without stopping, counting as before
Rnd 18...sc around randomly increasing 1 st (14sts)
Rnd 19...sc around randomly increasing 1 st (15sts)
Rnd 20 - 21...sc around increasing 1 st each round in center back only (17sts)
Rnd 22...sc around to within 3 sts of center back, hdc in next st, 2 hdcs in next 2 sts, hdc in next st, sc around to last sc before hdc
Rnd 23...sc in first hdc, sc dec 3 times, sc around to 1 st after center back, ch 1, turn
Rnd 24...sk 1 st, sc in next 8 sts, ch 1 turn
Rnd 25...sk 1 st, sc in next 6 sts, sc dec in last 2 sts, ch 1 turn
Rnd 26...sk 1 st, sc in next 4 sts, sc dec in last 2 sts
Fasten off leaving a 10 inch tail for sewing.
Make second leg the same as the first through round 22, make sure the next 4 rows are on the opposite side from the first leg.
BACK LEGS:
Rnd 1...form a ring around your finger, work 7 scs in ring, pull tight, join, ch 1, do not turn work now and throughout
Rnd 2...2 scs in joining st, sc in next sts 2 hdcs in next 3 sts, sc in next st, 2scs in next st, join, ch 1 (12sts)
Rnd 3...sc in joining st, 2 scs in next st, sc in next 2 sts, 2 hdcs in next 5 sts, sc in next 2 sts, 2scs in next st, join, ch 1 (19sts)
Rnd 4...sc in joining st, sc in next 18 sts, join, ch 1
Rnd 5...sc in joining st, sc in next 5 sts, sc dec 4 times, sc in next 5 sts, join, ch 1 (15sts)
Rnd 6...sc in joining st, sc in next 4 sts, sc dec 3 times , sc in next 4.
.Do Not join (12sts)
Rnd 7-9...sc around 12 sts without stopping
NOTE: Stop at this point to form toes. Place a small amount of fiber fill in the foot. Using a contrasting color yarn and yarn needle, insert needle in bottom of foot then up between hdcs of Rnd 3 then back down to same spot in bottom of foot
do this for all 4 toes, see close up. Using main color and yarn needle, take a couple of stitches in foot above toes to hold foot slightly flat.
Rnd 10-13...sc around 12 sts without stopping, counting as before
Rnd 14...2 hdcs in next 3 sts, sc in next 3 sts, 2scs in next st, sc in next 5 sts (16sts)
Rnd 15...sc dec 3 times, sc in next 4 sts, 2 scs in next 2 sts, sc in next 3 sts (14sts)
Rnd 16-17...sc around 14 sts without stopping, counting as before
Rnd 18...sc around randomly increasing 1 st (15sts)
Rnd 19...sc around randomly increasing 1 st (16sts)
Rnd 20 - 21...sc around increasing 1 st each round in center front only (18sts)
Rnd 22...2 scs in next 2 sts center back, sc 6, sc dec 2 times in center front, sc in next 4 sts (16sts)
Rnd 23 - 24...sc 16 sts
Rnd 25... Sc to center back, ch 1, turn
Rnd 26...2sc in first st, sc in next 10, ch 1, turn
Rnd 27...skip first st, sc in next 11
Rnd 28...sc in 11 sts
Rnd 29...skip first st, sc in next 10
Fasten off leaving a 10 inch tail for sewing.
Make second leg the same as the first through round 24, make sure the next 5 rows are on the opposite side from the first leg.
BODY:
Rnd 1...form a ring around your finger, work 6 scs in ring, pull tight, do not turn work now and throughout you will be working around
Rnd 2...2scs in next st, 2scs in next 5 sts, (12sts)
Rnd 3...(sc in next st, 2scs in next st) 6 times (18sts)
Rnd 4...(sc in next 2 sts, 2scs in next st) 6 times (24sts)
Rnd 5...(sc in next 3 sts, 2scs in next st) 6 times (30sts)
Rnd 6...(sc in next 4 sts, 2scs in next st) 6 times (36sts)
Rnd 7...(sc in next 5 sts, 2scs in next st) 6 times (42sts)
Rnd 8 - 17...sc around 42 sts
Rnd 18...(sc in next 2 sts, 2sc in next st) 6 times (belly section), sc in next 24 sts (48sts)
Rnd 19 - 52 sc around 48 sts
FASTEN OFF
CHEST AND NECK:
This is a best guess situation. Row 18 started the belly section so you need to start the chest in the area that the 6 increases were done. Since we are working in rounds, the stitches appear to twist. You can partially stuff body and try to untwist the stitches or leave them alone
that is entirely up to you. I just eyeball were the belly starts and attach my chest yarn where it looks like it should be. You can twist and adjust after stuffing and before attaching legs.
Row 1... Sc in next 9 sts from attachment, ch 1 turn
Row 2...2scs in first st, sc in next 7 sts, 2 scs in last st, ch 1, turn
Row 3 - 5...sc over 11 sts , ch 1, turn
Row 6...sc2, 2sc, sc5, 2sc, ch 1, turn
Row 7...sc13
Row 8...sc2, 2sc, sc7,2sc, ch 1, turn
Row 9 ..sc15
Row 10...sc2, 2sc, sc9sc, ch 1, turn
Row 11...sc17
Row 12...sc2, 2sc, s11, c, ch 1, turn
Row 13...sc 19, do not ch 1, do not turn
Sew sides of chest to body leaving the last row loose. Stuff firmly.
NECK:
sc around 13 sts of body back (you may have one or two stitches either way
dont worry about that, you can adjust in the next row.), sc around chest to other side. Join in first st, do not ch 1, do not turn you will be working in rounds from this point.
Next rnd
hdc in joining and next st, sc around to other side and work 2 hdcs in corner, sc across back to first hdc., join
NOTE: sc dec as many times as necessary evenly across back of neck until you have 31 sts.
Next rnd
.sc dec , sc 14 around posts of scs in the row below, sc dec 3times, sc5, sc dec 2 times (25sts)
Next rnd
sc around working in posts of sc in the row below on the back neck stitches only..as you did in last row.
Work over these 25 stitches for 2 or 3 more rows, depending on how long you want your neck to be.
Fasten off and stuff firmly
HEAD:
Rnd 1...ring, 6sc
Rnd 2...2sc (12sts)
Rnd 3... Sc 12
Rnd 4...(sc2, 2sc) 4 t 16sts
Rnd 5..sc 16
Rnd 6...(sc 3, 2scs)
Rnd 7...sc 20
Rnd 8...sc 1, hdc 1, 2hdc in next 7 times, hdc 1, sc 10 (27sts)
Rnd 9...hdc 2, (2 hdc, hdc1) 6 times, 2hdc, hdc 2, sc 10 (33sts)
Rnd 10...sc 2, hdc 20, sc 11
Rnd 11... (sc3, 2sc) 6 times, sc 9 (39sts)
Rnd 12...(sc 5, 2sc) 5 t, sc 14 (44 sts)
Rnd 13 - 15...sc 44
Rnd 16 - 17...sc around working 3 sc decs under chin area
NOTE: you may want to place the eyes and nose at this point and add your eye lids.
Rnd 18...sc around, working 3 sc decs across top of head. I do one dec over each eye and one in the center forehead.
Rnd 19...sc around
Rnd 20...sc around, working 2sc decs across top of head (between the 3 you did in rnd 16), and 2 sc decs under chin.
Next rounds
work (sc in next 2 sts, sc dec over next 2 sts) around until hole is about 1 ฝ inches
.stuff head firmly, sc dec around next 2 sts around and close hole.
Fasten off
EARS: Make 2 main color and 2 inside ear color
Row 1...ch 9, sc 8
Row 2-6...sc 8
Next rows
skip first st, sc across
..continue until only one stitch left. Fasten off
Hold one outside ear and one inside ear together and sc around using main color.
Fasten to head.

[คลิกเพื่อชมภาพขนาดจริง] |
|
| | |
จากคุณ :
akekiko   - [
24 ม.ค. 50 11:00:22
]
- [
24 ม.ค. 50 11:00:22
]
|
|
|
|
|
|